【Androidアプリ開発】カラーダイアログ(ColorPickerDialog)
前回はタブ表示を行いました。
ここまでAndroidのアプリを勉強してきて結構表現できることが増えてきました。今回勉強で作成してるTodoManagerは各ToDoをカテゴリーごとに分けれるように考えています。
そしてカテゴリー毎に色を付けて判断しやすいようにします。
そのカテゴリーで使う色はユーザーに選ばせたいので今回はColorPickerDialogをやろうと思います。
ColorPickerView
今回、作るカラーダイアログはこんな感じのものです。
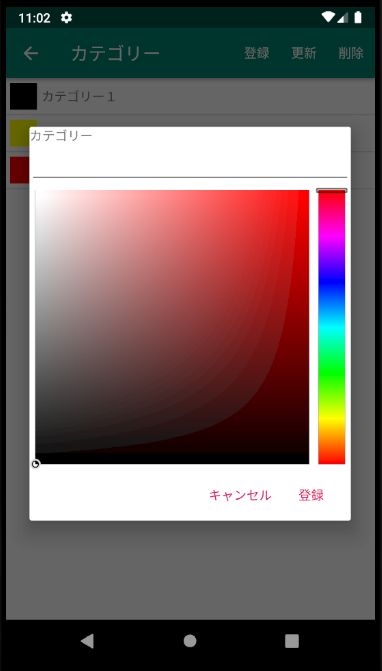
この例ではカテゴリー名とカテゴリーで使用する色を選択できるようになっています。
それではロジック部分です。
今回は「jaredrummler/ColorPicker」を使用しました。
dependencies {
        implementation 'com.jaredrummler:colorpicker:1.1.0'
}
ダイアログで表示するレイアウトです。
<?xml version="1.0" encoding="utf-8"?>
<LinearLayout xmlns:android="http://schemas.android.com/apk/res/android"
    android:orientation="vertical" android:layout_width="match_parent"
    android:layout_height="match_parent">

    <TextView
        android:id="@+id/tvCategory"
        android:layout_width="wrap_content"
        android:layout_height="wrap_content"
        android:text="@string/update_todo_category" />

    <EditText
        android:id="@+id/etCategoryName"
        android:layout_width="match_parent"
        android:layout_height="wrap_content"
        android:ems="10"
        android:inputType="text"/>

    <com.jaredrummler.android.colorpicker.ColorPickerView
        android:id="@+id/colorPicker"
        android:layout_width="wrap_content"
        android:layout_height="wrap_content"/>

</LinearLayout>
ダイアログのボタン名称文字列です。
<resources>
    (省略)
    <string name="dialog_category_btn_add">登録</string>
    <string name="dialog_category_btn_cancel">キャンセル</string>
</resources>
ダイアログの戻り値をActivity側で取得し、処理したいのでインターフェースを作成します。
package com.example.todomanager

interface DialogFragmentResultListener {
    fun onDialogFragmentResult(requestCode :Int, resultCode :Int, data :Any?)
}
ダイアログを表示するフラグメントです。
package com.example.todomanager

import android.app.Activity
import android.app.AlertDialog
import android.app.Dialog
import android.content.Context
import android.content.DialogInterface
import android.os.Bundle
import android.view.LayoutInflater
import android.view.View
import android.widget.EditText
import androidx.fragment.app.DialogFragment
import com.jaredrummler.android.colorpicker.ColorPickerView

class CategoryUpdateDialogFragment :  DialogFragment() {

    private var _view : View? = null

    override fun onCreateDialog(savedInstanceState: Bundle?): Dialog {
        //インフレイターを取得
        val layoutInflater = context?.getSystemService(Context.LAYOUT_INFLATER_SERVICE) as LayoutInflater
        //レイアウトをインフレイト
        _view = layoutInflater.inflate(R.layout.dialog_colorpicker, null, false)

        val colorPickerDialog = AlertDialog.Builder(context)
        //Positive Buttonを設定
        colorPickerDialog.setPositiveButton(R.string.dialog_category_btn_add, DialogButtonClickLister())
        //Negative Buttonを設定
        colorPickerDialog.setNegativeButton(R.string.dialog_category_btn_cancel, DialogButtonClickLister())

        colorPickerDialog.setView(_view)

        //ダイアログを作成し返す
        return colorPickerDialog.create()
    }

    private inner class DialogButtonClickLister : DialogInterface.OnClickListener {
        override fun onClick(dialog: DialogInterface, which: Int) {
            when(which) {

                //Positive Buttonならば
                DialogInterface.BUTTON_POSITIVE -> {
                    val activity = activity
                    if (activity is DialogFragmentResultListener) {
                        val listener = activity as DialogFragmentResultListener

                        //Viewが取得できなかった場合はキャンセルで返す
                        if (_view == null) {
                            listener.onDialogFragmentResult(targetRequestCode, Activity.RESULT_CANCELED, null)
                            return
                        }

                        //カテゴリー名と色を取得する
                        val etCategoryName = _view!!.findViewById<EditText>(R.id.etCategoryName)
                        val colorPicker = _view!!.findViewById<ColorPickerView>(R.id.colorPicker)

                        val categoryName = etCategoryName.text
                        val categoryColor = colorPicker.color

                        //戻り値用のマップを作成。
                        val resultData = mutableMapOf<String, Any?>("categoryName" to categoryName, "categoryColor" to categoryColor)

                        //登録ボタンを押した処理を返す。
                        listener.onDialogFragmentResult(targetRequestCode, Activity.RESULT_OK, resultData)
                    }
                }

                //Negative  Buttonならば
                DialogInterface.BUTTON_NEGATIVE -> {
                    val activity = activity
                    if (activity is DialogFragmentResultListener) {
                        val listener = activity as DialogFragmentResultListener
                        listener.onDialogFragmentResult(targetRequestCode, Activity.RESULT_CANCELED, null)
                    }
                }

            }
        }
    }
}
呼び出し部分です。
(省略)
class TodoCategoryManager : AppCompatActivity(), DialogFragmentResultListener {
(省略)
override fun onOptionsItemSelected(item: MenuItem): Boolean {
//メニューアイテムごとに処理を分ける。
when(item.itemId) {
//追加が押された時の処理
R.id.menuListOptAdd -> {
val dialog = CategoryUpdateDialogFragment()
dialog.show(supportFragmentManager, "CategoryUpdateDialogFragment")
}
}
return super.onOptionsItemSelected(item)
}
override fun onDialogFragmentResult(requestCode: Int, resultCode: Int, data: Any?) {
when(resultCode) {
Activity.RESULT_OK->{
//登録処理
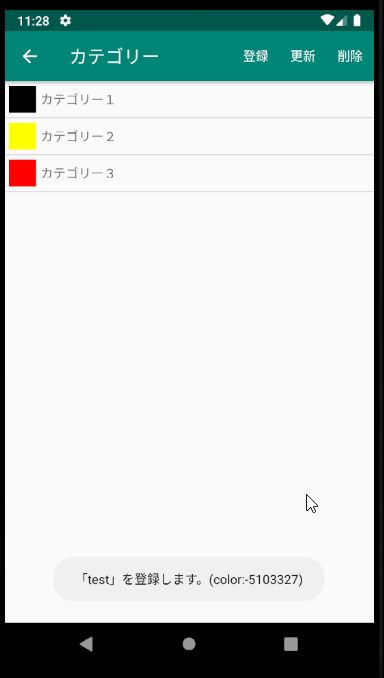
Toast.makeText(this, "「${(data as Map<String, Any?>).getValue("categoryName").toString() }」を登録します。(color:${(data).getValue("categoryColor").toString()})", Toast.LENGTH_SHORT).show()
}
Activity.RESULT_CANCELED -> {
//キャンセル処理
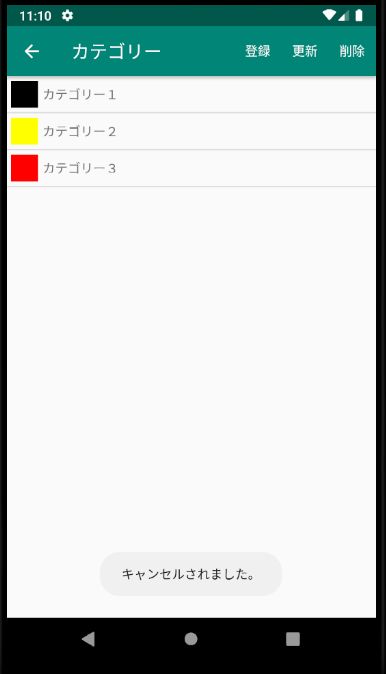
Toast.makeText(this, "キャンセルされました。", Toast.LENGTH_SHORT).show()
}
}
}
}
それでは説明していきます。
jaredrummler/ColorPickerを参照する
まずはColorPickerを参照設定します。
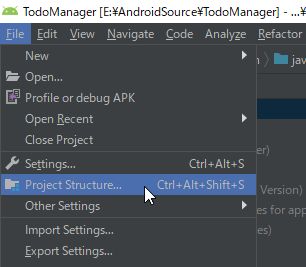
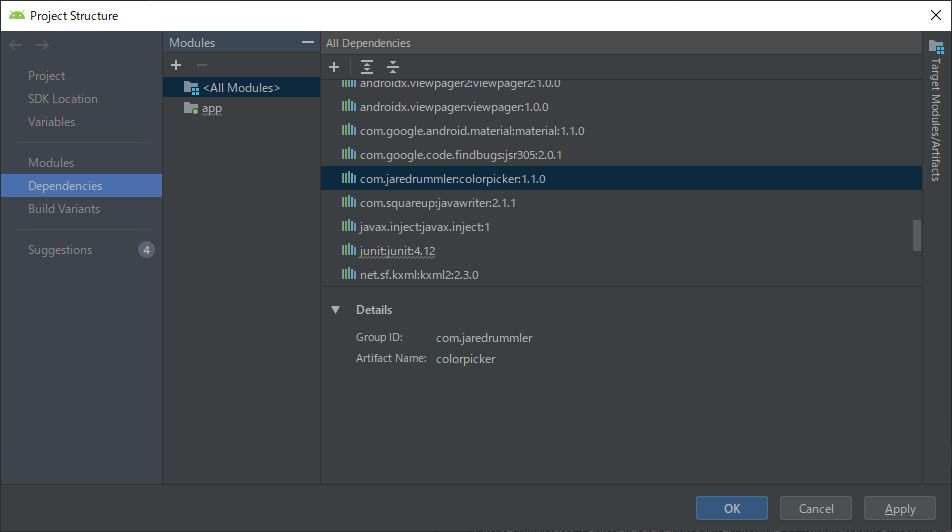
「File」-「Project Structure」を選択します。
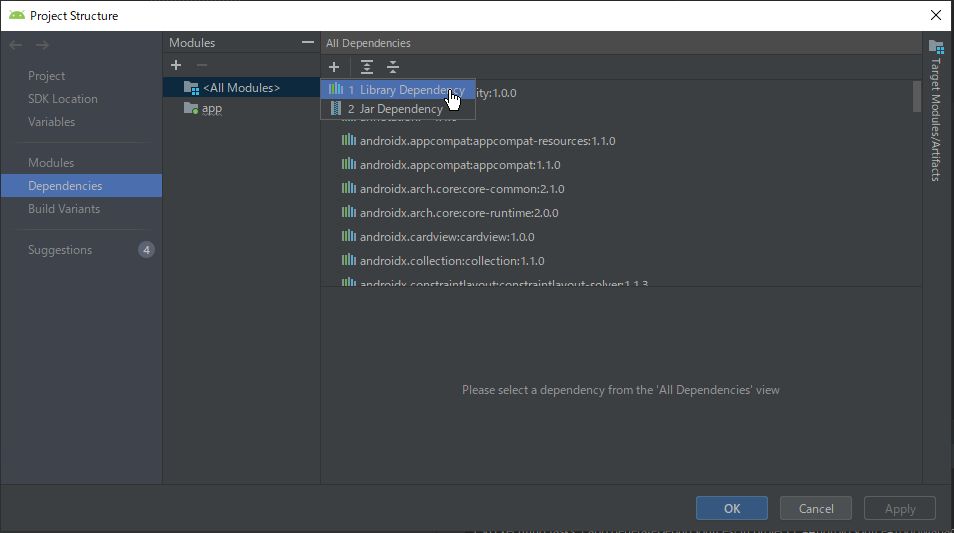
下記のAll Dependenciesの「+」をクリックし、「Library Dependency」を選択します。
Step1のテキストボックスに「colorpicker」と入力し「Search」ボタンをクリックします。
検索されたリストの中でcom.jaredrummlerを選択します。
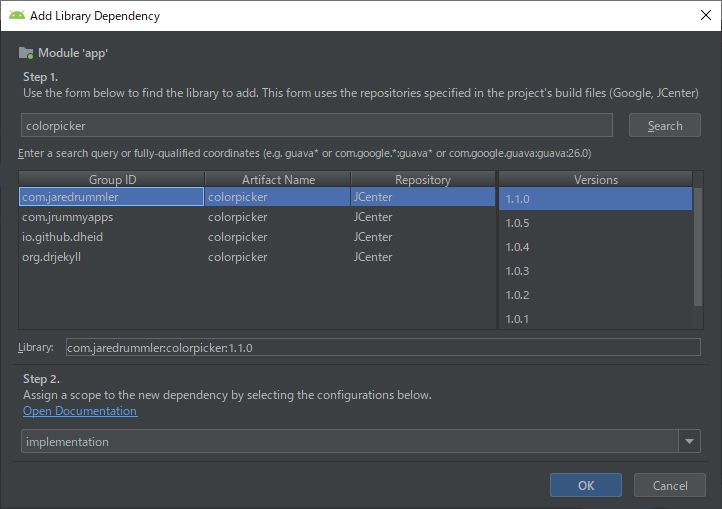
追加されていることを確認します。
ダイアログで使用するレイアウトを作成する
レイアウトを作成していきます。
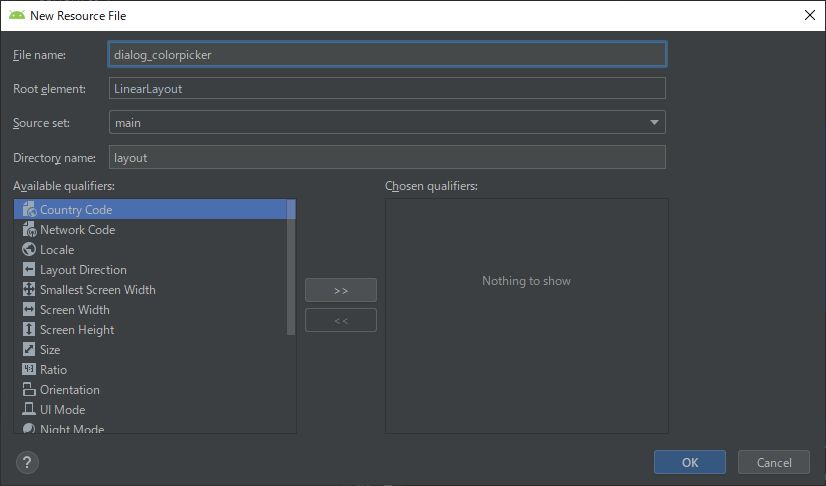
layoutフォルダを右クリックし「New」-「Layout resource file」を選択します。

File nameを入力し「OK」をクリックします。
レイアウトの中身を作っていきましょう。
カラーダイアログは以下のように入力します。
<com.jaredrummler.android.colorpicker.ColorPickerView
    android:id="@+id/colorPicker"
    android:layout_width="wrap_content"
    android:layout_height="wrap_content"/>
ダイアログの戻り値を取得するインターフェースを作成する
ダイアログを作成するときにPositiveボタンやNativeボタンを選択した場合の処理はダイアログ側で処理しないといけません。
しかしダイアログに処理を書いてしまうとダイアログを使いまわすことができなくなってしまうことがあります。
そのためインターフェースを利用して、ダイアログの結果を呼び出したActivityで取得できるようにします。
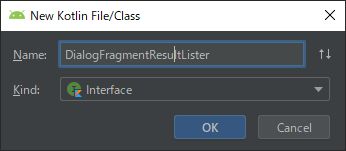
新しくクラスを作成します。

KindをインターフェースにしてNameを入力します。
作成する内容は以下です。
package com.example.todomanager

interface DialogFragmentResultListener {
    fun onDialogFragmentResult(requestCode :Int, resultCode :Int, data :Any?)
}
DialogFragmentを作成する
新しいクラスを作成します。
Kindは「Class」でフラグメント名を入力します。

onCreateDialogをオーバーライドする
onCreateと間違えないように注意してください。
ここで作成したレイアウトを取得しViewを作成します。そして、AlertDialog.Builderで作成したbuilderにViewを渡します。
override fun onCreateDialog(savedInstanceState: Bundle?): Dialog {
    //インフレイターを取得
    val layoutInflater = context?.getSystemService(Context.LAYOUT_INFLATER_SERVICE) as LayoutInflater
    //レイアウトをインフレイト
    _view = layoutInflater.inflate(R.layout.dialog_colorpicker, null, false)

    val colorPickerDialog = AlertDialog.Builder(context)
    //Positive Buttonを設定
    colorPickerDialog.setPositiveButton(R.string.dialog_category_btn_add, DialogButtonClickLister())
    //Negative Buttonを設定
    colorPickerDialog.setNegativeButton(R.string.dialog_category_btn_cancel, DialogButtonClickLister())

    colorPickerDialog.setView(_view)

    //ダイアログを作成し返す
    return colorPickerDialog.create()
}
PositiveボタンとNegativeボタンを押したときの処理を記述
OK(Positive)ボタンとキャンセル(Negative)ボタンを押したときの処理を書きます。
取得したactivityがDialogFragmentResultListerインターフェースを継承しているか確認し、していたら「onDialogFragmentResult」関数を呼び出します。
private inner class DialogButtonClickLister : DialogInterface.OnClickListener {
    override fun onClick(dialog: DialogInterface, which: Int) {
        when(which) {

            //Positive Buttonならば
            DialogInterface.BUTTON_POSITIVE -> {
                val activity = activity
                if (activity is DialogFragmentResultListener) {
                    val listener = activity as DialogFragmentResultListener

                    //Viewが取得できなかった場合はキャンセルで返す
                    if (_view == null) {
                        listener.onDialogFragmentResult(targetRequestCode, Activity.RESULT_CANCELED, null)
                        return
                    }

                    //カテゴリー名と色を取得する
                    val etCategoryName = _view!!.findViewById<EditText>(R.id.etCategoryName)
                    val colorPicker = _view!!.findViewById<ColorPickerView>(R.id.colorPicker)

                    val categoryName = etCategoryName.text
                    val categoryColor = colorPicker.color

                    //戻り値用のマップを作成。
                    val resultData = mutableMapOf<String, Any?>("categoryName" to categoryName, "categoryColor" to categoryColor)

                    //登録ボタンを押した処理を返す。
                    listener.onDialogFragmentResult(targetRequestCode, Activity.RESULT_OK, resultData)
                }
            }

            //Negative  Buttonならば
            DialogInterface.BUTTON_NEGATIVE -> {
                val activity = activity
                if (activity is DialogFragmentResultListener) {
                    val listener = activity as DialogFragmentResultListener
                    listener.onDialogFragmentResult(targetRequestCode, Activity.RESULT_CANCELED, null)
                }
            }

        }
    }
}
Activityより呼び出す
あとはActivityより呼び出すだけです。
呼び出すには以下のように書きます。
val dialog = CategoryUpdateDialogFragment()
dialog.show(supportFragmentManager, "CategoryUpdateDialogFragment")
呼び出された結果を取得するには「DialogFragmentResultListener」インターフェースの関数をオーバーライドします。
override fun onDialogFragmentResult(requestCode: Int, resultCode: Int, data: Any?) {
    when(resultCode) {
        Activity.RESULT_OK->{
            //登録処理
            Toast.makeText(this, "「${(data as Map<String, Any?>).getValue("categoryName").toString() }」を登録します。(color:${(data).getValue("categoryColor").toString()})", Toast.LENGTH_SHORT).show()
        }

        Activity.RESULT_CANCELED -> {
            //キャンセル処理
            Toast.makeText(this, "キャンセルされました。", Toast.LENGTH_SHORT).show()
        }
    }
}
動かしてみる
動かしてみましょう。入力して登録を押してみます。

キャンセルボタンも押してみます。
まとめ
今回使用した「jaredrummler/ColorPicker」はApache License 2.0です。
使用は無料ですし、商用利用も可能です。
会社がテレワークになり、幸い我が家は子育ても夫婦で行うものとしてやってきているのでずっと家にいて居場所がないなんてことにはなっていませんが、子供がガンガン仕事している部屋にやってきて騒いでいます。
仕事に集中したくてもできない。でも追っ払うとどこで何やってるかわからない。ジレンマですね。
結局、リビングで仕事しながら何かあればすぐ相手するってやってます。
早くコロナ収束してほしいものです。出掛けたい・・・。
ここまで読んで頂いてありがとうございます。