【Androidアプリ開発】サービスと通知
前回は、「リストビューのカスタマイズ」を行いました。
今回はバッググラウンドで動作するサービス、それと通知をやりたいと思います。
通知は別にサービスから呼ばなければいけないということはありませんが、通知を使用するタイミングはだいたいサービスからが多いと思いますのでついでに説明しようと思います。
サービス
サービスを使用するためのマニフェストファイルです。
<?xml version="1.0" encoding="utf-8"?>
<manifest xmlns:android="http://schemas.android.com/apk/res/android"
    package="com.example.todomanager">

    <application
        android:allowBackup="true"
        android:icon="@mipmap/ic_launcher"
        android:label="@string/app_name"
        android:roundIcon="@mipmap/ic_launcher_round"
        android:supportsRtl="true"
        android:theme="@style/AppTheme">
        <service
            android:name=".TodoAlarmService"
            android:enabled="true"
            android:exported="false"></service>

        <activity android:name=".TodoCategoryManager" />
        <activity android:name=".TodoDetailActivity" />
        <activity android:name=".TodoUpdateActivity" />
        <activity android:name=".MainActivity">
            <intent-filter>
                <action android:name="android.intent.action.MAIN" />

                <category android:name="android.intent.category.LAUNCHER" />
            </intent-filter>
        </activity>
    </application>

</manifest>
サービスを継承したクラスです。
package com.example.todomanager

import android.app.*
import android.content.Context
import android.content.Intent
import android.os.IBinder
import androidx.core.app.NotificationCompat

class TodoAlarmService : Service() {

    val INTERVAL_PERIOD = 5000
    val NOTIFICATION_ID = "todo_alarm_service_notification_channel"

    override fun onBind(intent: Intent): IBinder {
        TODO("Return the communication channel to the service.")
    }

    override fun onCreate() {
        super.onCreate()

        //通知チャンネルのID文字列を用意
        val id = NOTIFICATION_ID
        //通知チャンネル名
        val name = "test_notification"
        //通知チャンネルの重要度を標準に設定
        val importance = NotificationManager.IMPORTANCE_DEFAULT
        //通知チャンネルを生成
        val channel = NotificationChannel(id, name, importance)
        //NotificationManagerオブジェクトを取得
        val manager = getSystemService(Context.NOTIFICATION_SERVICE) as NotificationManager
        //通知チャンネルを設定
        manager.createNotificationChannel(channel)
    }

    override fun onStartCommand(intent: Intent, flags: Int, startId: Int): Int {

        execAlarm()

        scheduleNextTime(intent)

        return Service.START_STICKY
        //return super.onStartCommand(intent, flags, startId)
    }

    override fun onDestroy() {
        super.onDestroy()
    }

    fun execAlarm() {

        //Notificationを作成するBuilderクラスの生成
        val builder = NotificationCompat.Builder(applicationContext, NOTIFICATION_ID)
        //通知エリアに表示されるアイコンを設定
        builder.setSmallIcon(android.R.drawable.ic_dialog_info)
        //通知ドロワーでの表示タイトルを設定
        builder.setContentTitle("TodoManager")
        //通知ドロワーでの表示メッセージを設定
        builder.setContentText("タイマーです。")
        //起動先Activityクラスを指定したIntentオブジェクトを生成
        val intent = Intent(applicationContext, MainActivity::class.java)
        //起動先Activityに引き継ぎデータを格納
        intent.putExtra("fromNotification", true)
        //PendingIntentオブジェクトを取得
        val stopServiceIntent = PendingIntent.getActivity(applicationContext, 0, intent, PendingIntent.FLAG_CANCEL_CURRENT)
        //PendingIntentオブジェクトをビルダーに設定
        builder.setContentIntent(stopServiceIntent)
        //タップされた通知メッセージを自動的に消去するように設定
        builder.setAutoCancel(true)
        //BuilderからNotificationオブジェクトを生成
        val notification = builder.build()
        //NotificationManagerオブジェクトを取得
        val manager = applicationContext.getSystemService(Context.NOTIFICATION_SERVICE) as NotificationManager
        //通知
        manager.notify(0, notification)
    }

    fun scheduleNextTime(intent :Intent) {
        //現在のシステム時間を取得
        val now = System.currentTimeMillis()
        //アラーム用のPendingIntentを取得
        val alarmIntent = PendingIntent.getService(this, 0, intent, 0)
        //AlarmManagerを取得
        val am = this.getSystemService(Context.ALARM_SERVICE) as AlarmManager
        //次回サービス起動を予約
        am.set(AlarmManager.RTC, now + INTERVAL_PERIOD, alarmIntent)

    }
}
サービスの起動部分です。今回はMainActivityの起動時に呼び出すようにしました。
class MainActivity : AppCompatActivity(), DialogFragmentResultListener {
override fun onCreate(savedInstanceState: Bundle?) {
super.onCreate(savedInstanceState)
setContentView(R.layout.activity_main)
//インテントオブジェクトを生成
val intent = Intent(applicationContext, TodoAlarmService::class.java)
//サービス起動
startService(intent)
}
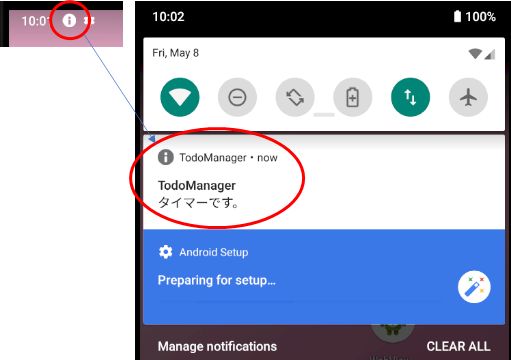
}サービスは画面がありませんのでスクリーンショットを撮りようがありませんが、通知はこのように表示されます。
サービスの作成
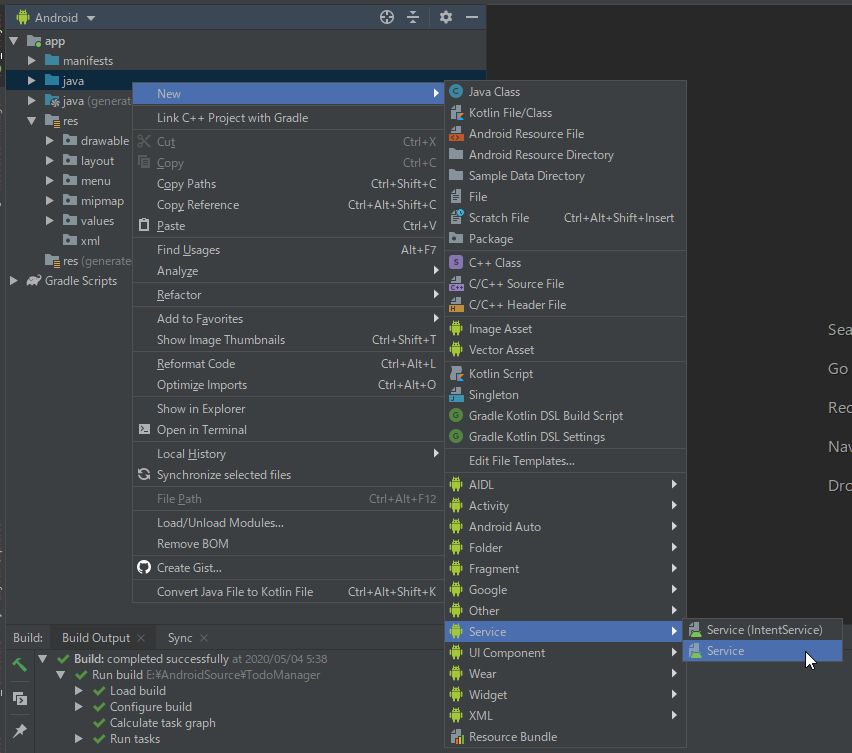
まずはサービスクラスを作成します。
javaフォルダを右クリックして「New」-「Service」-「Service」を選択します。
Class Name(クラス名)を入力します。
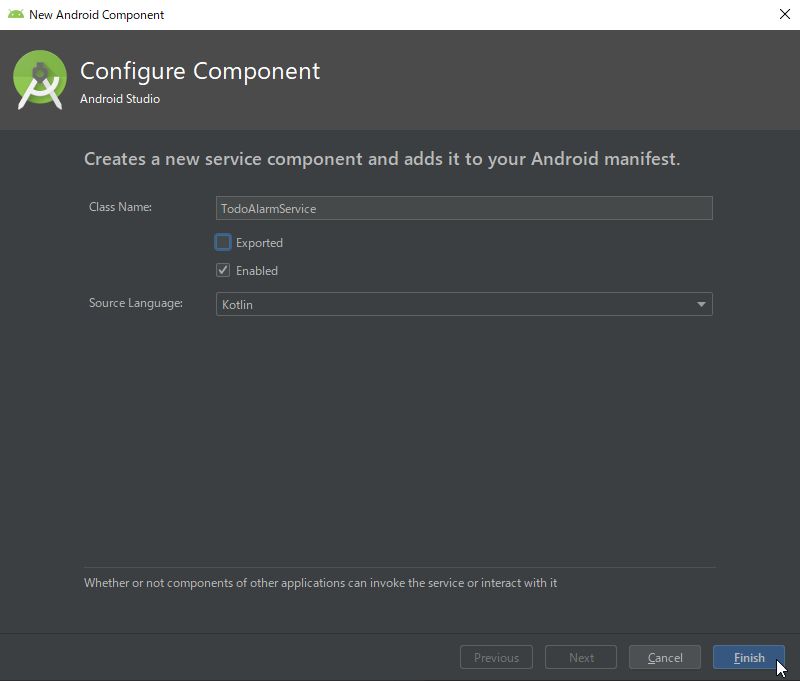
Exportedは、外部のアプリから利用可能にするかです。Enabledは登録したサービスを利用可能とするかどうかです。
Finishをクリックするとマニフェストファイルに自動的に登録され、クラスのファイルが作成されます。
package com.example.todomanager

import android.app.Service
import android.content.Intent
import android.os.IBinder

class TodoAlarmService : Service() {

    override fun onBind(intent: Intent): IBinder {
        TODO("Return the communication channel to the service.")
    }
}
onBindは「サービスのバインド」という方法で実行する場合に必要な処理を記述します。
他のアプリからサービスを呼び出す場合などActivityとServiceを結びつける場合に使用されます。
今回のように「startService」からサービスを起動する場合は使用しませんが、onBindは必ず記述しないといけません。
説明していきます。
class TodoAlarmService : Service() {

    val INTERVAL_PERIOD = 5000

    override fun onBind(intent: Intent): IBinder {
        TODO("Return the communication channel to the service.")
    }

    override fun onCreate() {
        super.onCreate()
        //サービス起動時の記述
    }

    override fun onStartCommand(intent: Intent, flags: Int, startId: Int): Int {

        execAlarm()

        scheduleNextTime(intent)

        return Service.START_STICKY
        //return super.onStartCommand(intent, flags, startId)
    }

    override fun onDestroy() {
        super.onDestroy()
        //サービス終了時の記述
    }

    fun execAlarm() {
       //サービスの処理を記述
    }

    fun scheduleNextTime(intent :Intent) {
        //現在のシステム時間を取得
        val now = System.currentTimeMillis()
        //アラーム用のPendingIntentを取得
        val alarmIntent = PendingIntent.getService(this, 0, intent, 0)
        //AlarmManagerを取得
        val am = this.getSystemService(Context.ALARM_SERVICE) as AlarmManager
        //次回サービス起動を予約
        am.set(AlarmManager.RTC, now + INTERVAL_PERIOD, alarmIntent)
    }
}
onCreate、onStartCommand、onDestroy
「onCreate」
サービスが作成されたときに呼び出されます。ここはサービスの初期処理を記述します。
「onStartCommand」
サービスが開始されたときに呼び出されます。ここにサービスで行いたい処理を記述します。
戻り値にサービスが強制終了した場合の振る舞いをIntで返します。
| 定数名 | 内容 |
|---|---|
| START_NOT_STICKY | サービスが強制終了されても自動で再起動しません。 常にサービスが動作する必要がなければ、この定数を返却する方が安全です。 |
| START_STICKY | サービスが強制終了された場合に自動で再起動します。 常にサービスを動作させる必要があればこの定数を返却します。 ただし、再起動時Intentはnullになります。 |
| START_REDELIVER_INTENT | サービスが強制終了された場合に自動で再起動します。 常にサービスを動作させる必要があればこの定数を返却します。 再起動時Intentは最後に渡されたIntentになります。 |
「onDestory」
サービスが破棄されるときに呼び出されます。ここは終了処理を記述します。
次回のサービス起動予約をする
サービスを繰り返し実行したい場合は、次回のサービス起動を予約します。
その場合は、AlarmManagerを利用します。INTERVAL_PERIODをあらかじめ設定しておきます。
今回の例でいえばINTERVAL_PERIOD=5000ms(5秒)後にサービスを再実行します。
fun scheduleNextTime(intent :Intent) {
    //現在のシステム時間を取得
    val now = System.currentTimeMillis()
    //アラーム用のPendingIntentを取得
    val alarmIntent = PendingIntent.getService(this, 0, intent, 0)
    //AlarmManagerを取得
    val am = this.getSystemService(Context.ALARM_SERVICE) as AlarmManager
    //次回サービス起動を予約
    am.set(AlarmManager.RTC, now + INTERVAL_PERIOD, alarmIntent)
}
Avticitiyからの呼び出し
サービスを実行します。
//インテントオブジェクトを生成
val intent = Intent(applicationContext, TodoAlarmService::class.java)
//サービス起動
startService(intent)
通知
続いてサービスの中で処理を行い、処理完了後の通知処理を説明します。
通知用のチャンネルの作成
通知をするためには通知チャンネルを生成しなければいけません。これはサービスが作成されたときに行っておきます。
override fun onCreate() {
    super.onCreate()

    //通知チャンネルのID文字列を用意
    val id = NOTIFICATION_ID
    //通知チャンネル名
    val name = "test_notification"
    //通知チャンネルの重要度を標準に設定
    val importance = NotificationManager.IMPORTANCE_DEFAULT
    //通知チャンネルを生成
    val channel = NotificationChannel(id, name, importance)
    //NotificationManagerオブジェクトを取得
    val manager = getSystemService(Context.NOTIFICATION_SERVICE) as NotificationManager
    //通知チャンネルを設定
    manager.createNotificationChannel(channel)
}
通知する
処理が完了した時に通知を行います。こちらは処理完了後に実行します。
fun execAlarm() {

    //Notificationを作成するBuilderクラスの生成
    val builder = NotificationCompat.Builder(applicationContext, NOTIFICATION_ID)
    //通知エリアに表示されるアイコンを設定
    builder.setSmallIcon(android.R.drawable.ic_dialog_info)
    //通知ドロワーでの表示タイトルを設定
    builder.setContentTitle("TodoManager")
    //通知ドロワーでの表示メッセージを設定
    builder.setContentText("タイマーです。")
    //起動先Activityクラスを指定したIntentオブジェクトを生成
    val intent = Intent(applicationContext, MainActivity::class.java)
    //起動先Activityに引き継ぎデータを格納
    intent.putExtra("fromNotification", true)
    //PendingIntentオブジェクトを取得
    val stopServiceIntent = PendingIntent.getActivity(applicationContext, 0, intent, PendingIntent.FLAG_CANCEL_CURRENT)
    //PendingIntentオブジェクトをビルダーに設定
    builder.setContentIntent(stopServiceIntent)
    //タップされた通知メッセージを自動的に消去するように設定
    builder.setAutoCancel(true)
    //BuilderからNotificationオブジェクトを生成
    val notification = builder.build()
    //NotificationManagerオブジェクトを取得
    val manager = applicationContext.getSystemService(Context.NOTIFICATION_SERVICE) as NotificationManager
    //通知
    manager.notify(0, notification)
}
今回は通知からActivityを起動する処理もいれています。通知からのActivityの起動はPendingIntentを使用します。
PendingIntentの」第4引数になっているフラグは以下になります。
| 定数 | 内容 |
|---|---|
| FLAG_CANCEL_CURRENT | 既存のPendingIntentがあれば破棄して新しいPendingIntentを返す |
| FLAG_NO_CREATE | 既存のPendingInetntがあればそれを使用し、なければnullを返す |
| FLAG_ONE_SHOT | 常に最初に作成されたPendingIntentを返す |
| FLAG_UPDATE_CURRENT | 既存のPendingIntentがあれば、それは破棄せずextraのデータだけ置き換えて返す |
まとめ
今回は、サービスと通知の説明をしました。
サービスは、手動でマニフェストファイルを記載し、クラスを作成してもよいですが、ウィザードを使って生成した方が簡単です。サービスで使用する内容を記述したら呼び出したいActivityからstartService関数で呼び出します。
通知は、通知用のチャンネルを生成しBuilderで作成したオブジェクトを呼び出します。
ここまで読んで頂いてありがとうございます。