【Androidアプリ開発】リストビューのカスタマイズ
前回はDataPickerDialogとTimePickerDialogをやりました。
今回は、リストビューをカスタマイズしてオリジナルレイアウトのリストビューを作成してみようと思います。
もともとSimpleAdapterというAdapterクラスが用意されていますが、これではテキストを置き換えることしかできませんでした。
私はデータベースに登録されているカテゴリーごとに色分けをしたかったので、Adapterも一緒にカスタマイズすることにしました。
オリジナルリストビューを作成する
レイアウトファイルです。
<?xml version="1.0" encoding="utf-8"?>
<LinearLayout xmlns:android="http://schemas.android.com/apk/res/android"
    xmlns:app="http://schemas.android.com/apk/res-auto"
    xmlns:tools="http://schemas.android.com/tools"
    android:orientation="horizontal"
    android:layout_width="match_parent"
    android:layout_height="match_parent">

    <ImageView
        android:id="@+id/ivColor"
        android:layout_width="30dp"
        android:layout_height="30dp"
        android:layout_margin="5dp"
        tools:srcCompat="@android:color/holo_red_dark"
     />

    <TextView
        android:id="@+id/tvCategoryName"
        android:layout_width="0dp"
        android:layout_height="wrap_content"
        android:layout_weight="1"
        android:layout_gravity="center_vertical"
        />

</LinearLayout>
アダプタを作成します。
package com.example.todomanager

import android.content.Context
import android.view.LayoutInflater
import android.view.View
import android.view.ViewGroup
import android.widget.ImageView
import android.widget.SimpleAdapter
import android.widget.TextView

class SimpleCategoryAdapter(context: Context, list: List<Map<String, Any?>>, layout :Int, from :Array<String>, to :IntArray) : SimpleAdapter(context, list, layout, from, to) {

    val _context = context
    val _layoutInfrater = context.getSystemService(Context.LAYOUT_INFLATER_SERVICE) as LayoutInflater
    val _list = list

    override fun getView(position: Int, convertView: View?, parent: ViewGroup?): View {

        //category_rowのレイアウトをインフレイト
        var convertCategoryView = _layoutInfrater.inflate(R.layout.category_row, parent,false);

        //タイトルの設定
        val tvCategoryName = convertCategoryView.findViewById<TextView>(R.id.tvCategoryName)
        tvCategoryName.text = _list[position]["name"].toString()

        //色の設定
        val ivColor = convertCategoryView.findViewById<ImageView>(R.id.ivColor)
        ivColor.setBackgroundColor(_list[position]["color"] as Int)

        //return super.getView(position, convertView, parent)
        return convertCategoryView
    }

}
Activityから呼び出します。
(省略)

class TodoCategoryManager : AppCompatActivity(), DialogFragmentResultListener  {

    private val _helper = DatabaseHelper(this)

    private var _categoryList : List<Map<String, Any?>>? = null
    private val FROM = arrayOf("name", "color")
    private val TO = intArrayOf(R.id.tvCategoryName, R.id.ivColor)

    override fun onCreate(savedInstanceState: Bundle?) {
        super.onCreate(savedInstanceState)
        setContentView(R.layout.activity_todo_category_manager)

        //Todoリストを取得する
        val lvCategoryList = findViewById<ListView>(R.id.lvCategoryList)

        //TODOをデータベースから取得する
        _categoryList = _helper.getCategories()

        //SimpleAdapterを生成
        val adapter = SimpleCategoryAdapter(applicationContext, _categoryList!!, R.layout.category_row, FROM, TO)

        //アダプタの登録
        lvCategoryList.adapter = adapter

    }

(省略)
}
表示すると以下のようになります。
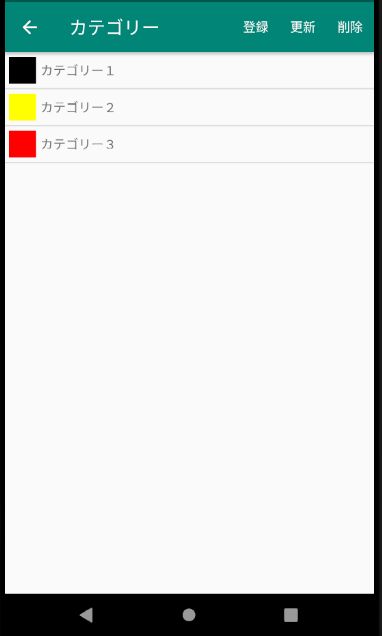
それでは説明していきます。
レイアウトの作成
リストビューの行の中に入るレイアウト作成します。
「layout」を右クリックして「Layout resource file」を選択します。

ファイル名を入力します。Root elementは「LinearLayout」を指定しました。
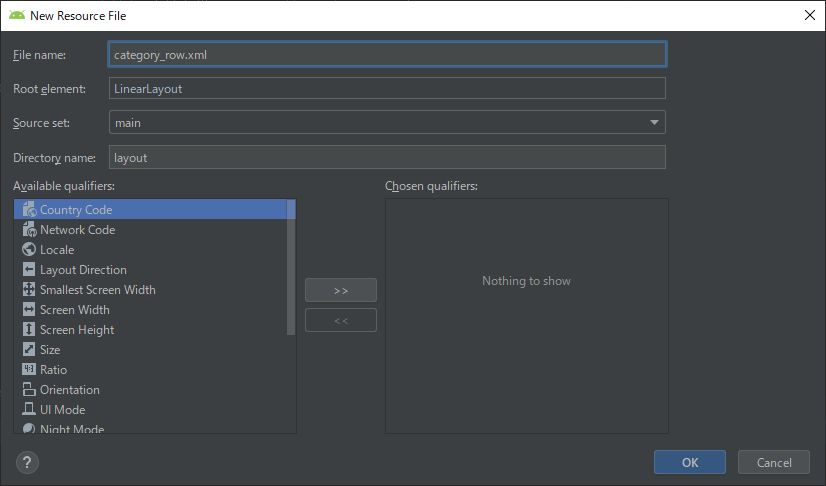
以下のファイルが作成されます。
<?xml version="1.0" encoding="utf-8"?>
<LinearLayout xmlns:android="http://schemas.android.com/apk/res/android"
    android:orientation="vertical"
    android:layout_width="match_parent"
    android:layout_height="match_parent">

</LinearLayout>
これを自分の好きなレイアウトに変更します。
<?xml version="1.0" encoding="utf-8"?>
<LinearLayout xmlns:android="http://schemas.android.com/apk/res/android"
    xmlns:app="http://schemas.android.com/apk/res-auto"
    xmlns:tools="http://schemas.android.com/tools"
    android:orientation="horizontal"
    android:layout_width="match_parent"
    android:layout_height="match_parent">

    <ImageView
        android:id="@+id/ivColor"
        android:layout_width="30dp"
        android:layout_height="30dp"
        android:layout_margin="5dp"
        tools:srcCompat="@android:color/holo_red_dark"
     />

    <TextView
        android:id="@+id/tvCategoryName"
        android:layout_width="0dp"
        android:layout_height="wrap_content"
        android:layout_weight="1"
        android:layout_gravity="center_vertical"
        />

</LinearLayout>
ここは特に本題とはあまり関係ないので詳しくは割愛します。
大雑把に説明すると、LinearLayoutを横方向にしてカテゴリーの色(30×30)、カテゴリー名(縦に中央寄席)と表示するようにしました。
Adapterを継承してオリジナルレイアウトに対応させる
SimpleAdapterがあるのでこれを流用させてもらいます。
新しいクラスを作成します。

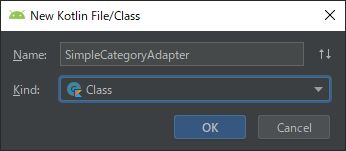
package com.example.todomanager

class SimpleCategoryAdapter {
}
SimpleAdapterを継承してgetViewをオーバーライド(上書き)します。
package com.example.todomanager

import android.content.Context
import android.view.LayoutInflater
import android.view.View
import android.view.ViewGroup
import android.widget.ImageView
import android.widget.SimpleAdapter
import android.widget.TextView

class SimpleCategoryAdapter(context: Context, list: List<Map<String, Any?>>, layout :Int, from :Array<String>, to :IntArray) : SimpleAdapter(context, list, layout, from, to) {

    val _context = context
    val _layoutInfrater = context.getSystemService(Context.LAYOUT_INFLATER_SERVICE) as LayoutInflater
    val _list = list

    override fun getView(position: Int, convertView: View?, parent: ViewGroup?): View {

        //category_rowのレイアウトをインフレイト
        var convertCategoryView = _layoutInfrater.inflate(R.layout.category_row, parent,false);

        //タイトルの設定
        val tvCategoryName = convertCategoryView.findViewById<TextView>(R.id.tvCategoryName)
        tvCategoryName.text = _list[position]["name"].toString()

        //色の設定
        val ivColor = convertCategoryView.findViewById<ImageView>(R.id.ivColor)
        ivColor.setBackgroundColor(_list[position]["color"] as Int)

        //return super.getView(position, convertView, parent)
        return convertCategoryView
    }

}
順に説明します。
まずは継承部分です。
Kotlin「:」(コロン)で区切って記述します。
class SimpleCategoryAdapter(context: Context, list: List<Map<String, Any?>>, layout :Int, from :Array<String>, to :IntArray) : SimpleAdapter(context, list, layout, from, to)getViewをオーバーライドして行に表示する内容を記述します。
    val _context = context
    val _layoutInfrater = context.getSystemService(Context.LAYOUT_INFLATER_SERVICE) as LayoutInflater
    val _list = list

    override fun getView(position: Int, convertView: View?, parent: ViewGroup?): View {

        //category_rowのレイアウトをインフレイト
        var convertCategoryView = _layoutInfrater.inflate(R.layout.category_row, parent,false);

        //タイトルの設定
        val tvCategoryName = convertCategoryView.findViewById<TextView>(R.id.tvCategoryName)
        tvCategoryName.text = _list[position]["name"].toString()

        //色の設定
        val ivColor = convertCategoryView.findViewById<ImageView>(R.id.ivColor)
        ivColor.setBackgroundColor(_list[position]["color"] as Int)

        //return super.getView(position, convertView, parent)
        return convertCategoryView
    }
まずレイアウトをインフレイトします。インフレイトとは「膨らませる」という意味ですがここでは、viewリソースを指定したレイアウトで使用するという意味です。
取得したレイアウトのViewを取得して設定したい内容をセットしています。
最後に親クラスのviewではなく自分で作成したviewを渡せば完了です。
Activityからの呼び出し
Activityから呼び出します。基本的にSimpleAdapterと同じにしました。
private val _helper = DatabaseHelper(this)

private var _categoryList : List<Map<String, Any?>>? = null
private val FROM = arrayOf("name", "color")
private val TO = intArrayOf(R.id.tvCategoryName, R.id.ivColor)

override fun onCreate(savedInstanceState: Bundle?) {
    super.onCreate(savedInstanceState)
    setContentView(R.layout.activity_todo_category_manager)

    //Todoリストを取得する
    val lvCategoryList = findViewById<ListView>(R.id.lvCategoryList)

    //TODOをデータベースから取得する
    _categoryList = _helper.getCategories()

    //SimpleAdapterを生成
    val adapter = SimpleCategoryAdapter(applicationContext, _categoryList!!, R.layout.category_row, FROM, TO)

    //アダプタの登録
    lvCategoryList.adapter = adapter

}
まとめ
リストのレイアウトをカスタマイズできるなんてAndroidって便利ですね。C#でもできないことはないですがこれよりは大分面倒です。
Android開発ができると自分の作りたいようにアプリを作れる。またそれが完成に近づいてくるとワクワクしてきます。
自分はパソコン苦手なのでこんなの作れない。初心者なのでわかりません。なんてよく耳にします。
実はこの記事を書く時、スルっと書いてるわけではありません。トライ&エラーを繰り返しています。
意味が分からないところは調べて解決しました。
忘れないように記事にしよう、同じように困ってる人に教えようというのが思いです。
自分も初心者だった時期もあります。先輩がいうことがわけわからなくて、当時C++を勉強してもポインタが理解できませんでした。
でもやってるとふっと「そういうことか!」って思う時が必ずあります。そしていつか気づくはず、プログラミング言語は違ってもオブジェクト指向の考え方はどれも同じなんです。
今回、Kotlinの記事を書いていますが、KotlinやったのもAndroid開発をしたのもこれが初めてです。それでもそんなにつまづくことなくここまでやれるのは、経験からであることが大きいです。
今はわからなくても問題ありません。大事なのは続けること、そうすればいつかわかるときがくる。
私はそう思います。
ここまで読んで頂いてありがとうございます。